
Season Launch Checklist
Prior to the start of a new season there are a few key updates to make in Spinzo to be prepared.
Close Out Previous Season:
Third Party Payments: Batch out payments from last season. Reference this guide on Spinzo Pulse for how to.
Archive Old Groups: If there are groups that will not be used for the coming season (one time promotion, promotion tied to old player, etc) the best practice is to archive these groups.
Prior to Schedule Release:
Sales Reps: Delete any reps no longer at the organization, add any new reps with their Archtics rep ID
Users: Revoke access to any old users in the platform and add new users.
When a new user is added they will need to follow the below steps to complete their account.
1. Go to Spinzo.com
2. Click Management Dashboard
3. Select to sign up and use your work email.
4. Choose a password and hit submit.
5. Then login with the new credentials.
6. Moving forward either bookmark the dashboard page, or come back to spinzo.com
Seating Chart: Update your seating chart to reflect the most accurate version. Label ticket classes and add in private note field the parent price code for each.
Seller Level Questions: Refresh data collection questions. Best practice is to hide questions you would no longer like to use and create new questions. This is recommended as opposed to changing responses.
Branding Templates: Take inventory of current branding templates. Add new branding templates needed for the season and choose a default.
Tracking Pixels: Touch base with marketing and/or Business Intelligence to ensure the most accurate pixels are set up on the pages. For more details on tracking pixels reference these two Pulse articles. Tracking Pixel Capabilities and Placeing Tracking Pixels with Variable Data.
Post Schedule Release:
Archtics Set-up: Once events and price codes are built in the system, Spinzo needs access to them. Complete steps 3 through 5 on the Archtics Set-up here.
**Once events are added to the Spinzo item set, you must Update the Event Cache in Spinzo to display the event names in the drop down. Need a step by step of how to do this, reference this Pulse Article.
Match up Images: Add new match-up images to the seller level image bank. Old images can be deleted.
Once your schedule is released, a default listing image group can be updated or created.
To identify your previous default group or set up a new default listing image group, go to the Settings tab, reference the Default Group for Listing Image a little over halfway down the page:
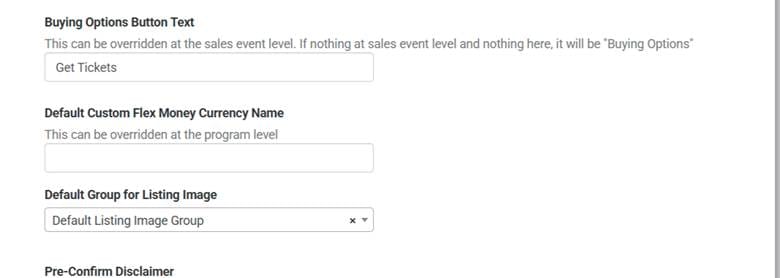
Choose or reference your current group.
Go to that group and create sales events for each game or event in your season. Using the image icon at the sales event level, add an image for each event. Once this is complete on the default listing image group, any event with the exact same date and time will honor the respective image of the default group.
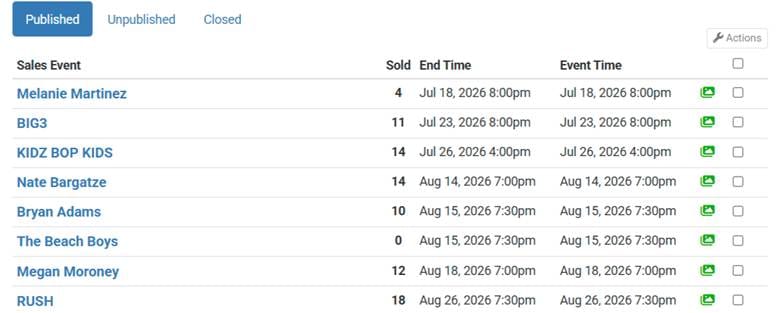
Please note when looking at the listing image icon, when the image is green- it is using the standard default, if it is blue you have overridden the image and when it is red you have intentionally chosen to remove the image.
This Pulse Article provides a step by step guide.